LaTeX 宏包介绍(一)—— amsthm
介绍
amsthm 是美国数学会开发的用于定理类环境的宏包,它为用户提供了几个主要的宏:
\newtheorem\theoremstyle\newtheoremstyle
用于定义定理类环境,另外,amsthm 还提供了一个 proof 环境,用于填写证明过程。
如果 amsthm 宏包与非 AMS 文档类以及 amsmath 宏包一起使用,需要先调用 amsmath 再调用 amsthm。
定义定理类环境
使用 \newtheorem 便可以定义定理类环境,例如
\newtheorem{theorem}{Theorem}
为我们定义了一个名为 theorem 的环境。
接下来便可以直接使用该环境,例如:
\begin{theorem}
  This is a theorem.
\end{theorem}

从编译后的结果图中可以看出,定理头由指定的文本 Theorem、自动生成的定理编号以及标点符号 . 组成,并且定理头部分被自动加粗。而 theorem 环境中的内容 This is a theorem. 以意大利斜体形式接在定理头后面。
如果不想让 theorem 环境自动编号,则需要使用 \newtheorem 的变体 \newtheorem*,即
\newtheorem*{theorem}{Theorem}
我们还可以为 theorem 环境添加一个可选参数以提供附加信息,例如:
\begin{theorem}[Fredholm Alternative]
  Let $E$ be a Banach space and $T\in\mathcal{K}(E)$,
  then $I-T$ is injective if and only if $I-T$ is surjective.
\end{theorem}

可以看到,可选参数被圆括号包裹后放置于定理编号和标点符号 . 之间。
有时候,我们想要类似于下面的效果(用来「强调某个定理的独特性和重要性」):

这时,我们可以巧妙地运用 \newtheorem* 来实现这一效果:
%-----导言区-----
\newtheorem*{MP}{Maximum Principle}
%-----正文-----
\begin{MP}
  If $\Delta u = 0$ in $\Omega$, then $u$ attains its maximum on $\partial\Omega$.
\end{MP}
定理编号
定理类环境既可以拥有自己独立的计数器,也可以依附于某个上级计数器,或者与其它环境共享同一个计数器。
依附于上级计数器
语法为:
\newtheorem{<环境名>}{<定理头文本>}[<上级计数器>]
例如:
\newtheorem{theorem}{Theorem}[section]
将使得 theorem 为 section 的下级计数器,且 theorem 环境的计数格式形如 Theorem 1.1、Theorem 1.2, 当 section 自增时,theorem 重置为零。
共享计数器
语法为:
\newtheorem{<环境名>}[<共享计数器>]{<定理头文本>}
例如,我们经常将定理、引理和推论放在一起连续编号:
\newtheorem{theorem}{Theorem}
\newtheorem{lemma}[theorem]{Lemma}
\newtheorem{corollary}[theorem]{Corollary}
修改环境格式
定理风格以及 \theoremstyle
在 amsthm 中有一个概念叫做定理风格,它决定着由 \newtheorem 定义的环境的具体格式,有三种定理风格是预定义的,它们分别是:
plain: 环境内容使用意大利斜体,环境上下方添加额外间距definition: 环境内容使用罗马正体,环境上下方添加额外间距remark: 环境内容使用罗马正体,环境上下方不添加额外间距
当我们不显式指定定理风格时,默认使用 plain 风格。而当我们需要显式指定某一定理风格时,就要用到本文开头所提到的 \theoremstyle 命令。例如定义 definition 风格的环境 defn:
\theoremstyle{definition}
\newtheorem{defn}{Definition}
交换定理编号与定理名的位置
有时候我们想要类似于 1.1 定理 这样的效果,这时可以使用 amsthm 提供的 \swapnumbers,该命令对在它后面定义的定理类环境起作用,而对在它前面定义的定理类环境不起作用,比方说,
\documentclass{article}
\usepackage{amsthm}
\theoremstyle{definition}
\newtheorem{definition}{Definition}

\swapnumbers

\theoremstyle{plain}
\newtheorem{theorem}{Theorem}[section]
\begin{document}

\section{Introduction}\label{sec:1}

\begin{definition}
  This is a definition.
\end{definition}

\begin{theorem}
  This is a theorem.
\end{theorem}

\end{document}

为了格式上的一致性,还是建议将
\swapnumbers放在最前面,使其作用于所有定理类环境。
自定义定理风格
虽然 amsthm 预定义了三种定理风格,但是并不能满足所有用户的需求,于是 amsthm 干脆提供了一个自定义定理风格的接口,叫做 \newtheoremstyle,使用方法为:
\newtheoremstyle{<风格名>}
                {<上方间距>} % 若留空,则使用默认值
                {<下方间距>} % 若留空,则使用默认值
                {<主体字体>} % 如 \itshape
                {<缩进长度>} % 若留空,则无缩进;可以使用 \parindent 进行正常段落缩进
                {<定理头字体>} % 如 \bfseries
                {<定理头后的标点符号>} % 如点号、冒号
                {<定理头后的间距>} % 不可留空,若设置为 { },则表示正常词间间距;若设置为 {\newline},则环境内容开启新行
                {<定理头格式指定>} % 一般留空
于是,最简洁的定理风格便是这样的:
\newtheoremstyle{<style name>}{}{}{}{}{}{}{ }{}
但是这样做没什么意义,该强调的没有被强调出来!😅
顺便提供一个相应的 VS Code 用户代码片段(关于配置用户代码片段的内容,请见另一篇文章 Visual Studio Code 的正确打开方式):
 "newtheoremstyle":{
 "prefix": "nts",
 "body": ["\\newtheoremstyle{$1}",
           "\t\t\t\t\t\t\t\t{$2} % 上方间距",
           "\t\t\t\t\t\t\t\t{$3} % 下方间距",
           "\t\t\t\t\t\t\t\t{$4} % 主体字体",
           "\t\t\t\t\t\t\t\t{$5} % 缩进长度",
           "\t\t\t\t\t\t\t\t{$6} % 定理头字体",
           "\t\t\t\t\t\t\t\t{$7} % 标点符号",
           "\t\t\t\t\t\t\t\t{$8} % 定理头后间距",
           "\t\t\t\t\t\t\t\t{$9} % 定理头格式指定"]
 }
一些特殊情形 🧐
需要将定理环境的可选参数加粗
可以将 \newtheoremstyle 的第九个参数 <定理头格式指定> 派上用场了😎,例如,我们按如下方式定义定理风格 bfnote:
\newtheoremstyle{bfnote}
                {} % 上方间距
                {} % 下方间距
                {} % 主体字体
                {} % 缩进长度
                {\bfseries} % 定理头字体
                {.} % 标点符号
                { } % 定理头后间距
                {\thmname{#1}\thmnumber{ #2}\thmnote{ (#3)}} % 定理头格式指定
然后以此为基础定义一个定理类环境 note:
\theoremstyle{bfnote}
\newtheorem{note}{Note}
%-----正文-----
\begin{note}[optional argument]
This is a note.
\end{note}

斜体环境中需要正体括号
- 方法一:使用
\textup - 方法二:使用
embrac宏包提供的\emb、\embparen和\embbracket
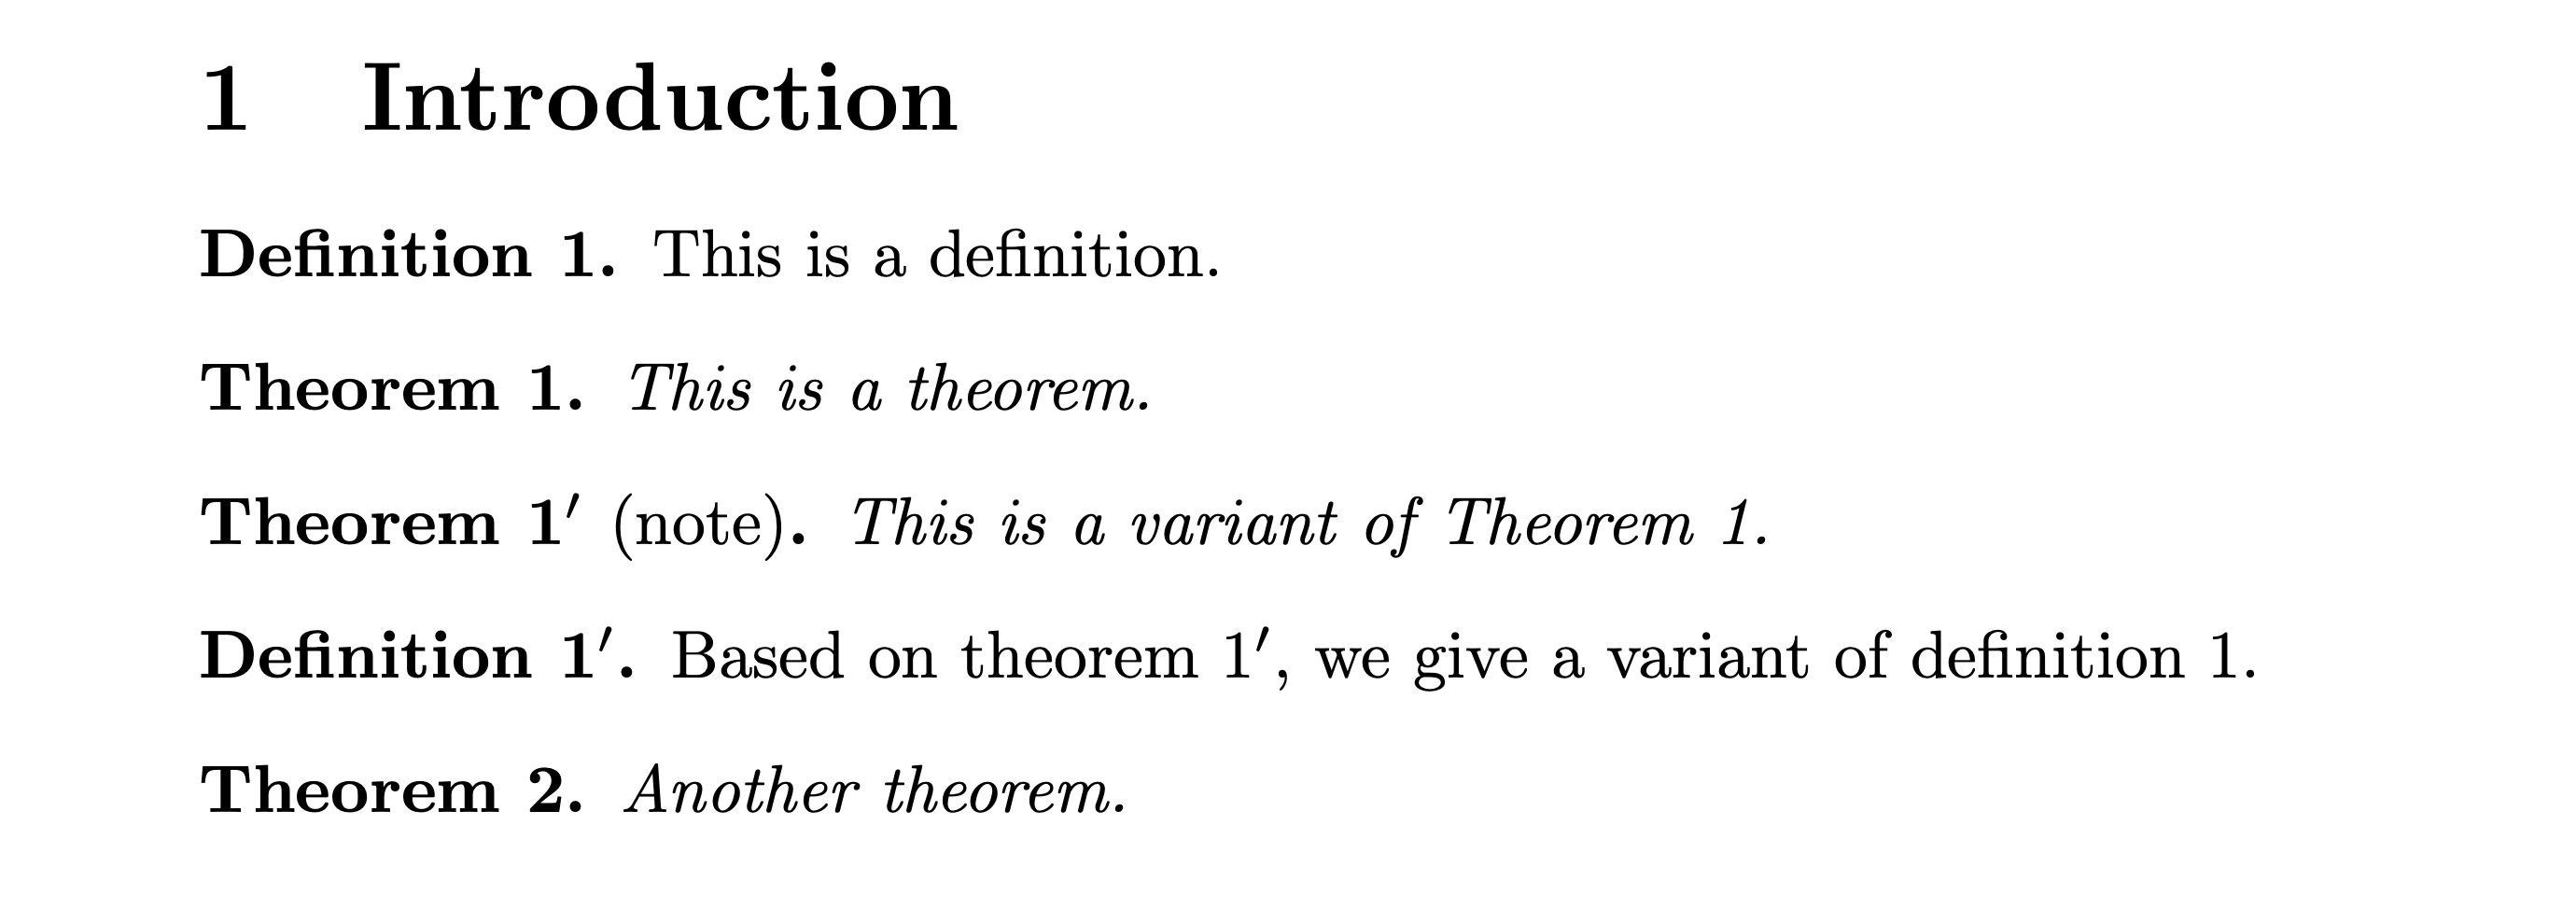
需要编号形如 $n^\prime$ 的定理头
有些时候会遇到这样的情况:后面的某个定理是前面某个定理的变体,此时我们希望两个定理的编号分别为 $n$ 和 $n^\prime$。
如果不涉及到 hyperref 宏包,那么方案要简单一些:
\documentclass{article}
\usepackage{amsthm}
\theoremstyle{definition}
\newtheorem{definition}{Definition}

\theoremstyle{plain}
\newtheorem{theorem}{Theorem}

\NewDocumentEnvironment{variant}{O{theorem} D(){} m}
  {\addtocounter{#1}{-1}%
   \expandafter\renewcommand\csname the#1\endcsname{\ref{#3}$'$}%
   \begin{#1}[#2]}
  {\end{#1}}

\begin{document}

\section{Introduction}\label{sec:1}

\begin{definition}\label{defn:1}
  This is a definition.
\end{definition}

\begin{theorem}\label{thm:1}
  This is a theorem.
\end{theorem}

\begin{variant}(note){thm:1}\label{thm:1prime}
  This is a variant of Theorem \ref{thm:1}.
\end{variant}

\begin{variant}[definition]{defn:1}
  Based on theorem \ref{thm:1prime}, we give a variant of definition \ref{defn:1}.
\end{variant}

\begin{theorem}
  Another theorem.
\end{theorem}

\end{document}

如果涉及到 hyperref 宏包,可以参考 egreg 提供的方法:
\makeatletter
\newcommand{\neutralize}[1]{\expandafter\let\csname c@#1\endcsname\count@}
\makeatother

\NewDocumentEnvironment{variant}{O{theorem} m}
  {\neutralize{#1}\phantomsection%
   \expandafter\renewcommand\csname the#1\endcsname{\ref*{#2}$'$}%
   \begin{#1}}
  {\end{#1}}
证明环境
源码中 proof 环境的定义如下:
\newenvironment{proof}[1][\proofname]{\par
  \pushQED{\qed}%
  \normalfont \topsep6\p@\@plus6\p@\relax
  \trivlist
  \item[\hskip\labelsep
        \itshape
    #1\@addpunct{.}]\ignorespaces
}{%
  \popQED\endtrivlist\@endpefalse
}
\providecommand{\proofname}{Proof}
关于 proof 环境有如下几点说明:
proof环境可以嵌套使用- 证明环境的头文本默认为
Proof,可以通过可选参数更改,如\begin{proof}[Proof of Theorem 2.5, concluded] some text \end{proof} - 证明环境的头文本字体默认为
\itshape,可根据需要使用其他字体,如\bfseries - 头文本后面默认有一个句号(通过
\@addpunct{.}添加) proof环境内部使用了平凡列表环境trivlist,这样做保证了垂直间距的美观与统一性,trivlist环境将\leftmargin、\labelwidth和\itemindent都设置为零,而且标签盒子的起始位置是通过将\itemindent的参考点向左移动\labelwidth$+$\labelsep得到的。在当前情况下,\itemindent的参考点刚好位于版心左边界上,而\labelwidth$+$\labelsep等于\labelsep,所以标签盒子的起始位置超出了版心边界,与左边界的距离为\labelsep,这也就是为什么trivlist的\item中会有\hskip\labelsep-
\ignorespaces为 $\TeX$ 原语,顾名思义,其作用为忽略其后的所有空格(无论是显式空格或者\space),直到遇到第一个非 space token \p@、\@plus的定义为:\newdimen\p@ \p@=1pt \def\@plus{plus}所以
\topsep6\p@\@plus6\p@实际上就是\topsep 6pt plus 6pt
最后的最后
今天是 2022 年的最后一天,祝大家新年快乐。